Home | Vietnam Poetry | Hue-1968 | RAAF Bushranger | Close Call | Nam Kits List | Workshop | Coming Soon... | Contact Me
RAAF Bushranger Gunship

LEST WE FORGET

br1.jpg

BACKGROUND


My Featured Model is the Revell 1/32 UH-1H Gunship.

I bought it upon intending to build it as the classic M-6 Machine

guns and 2.75 Rockets, but soon decided to build it into the

Australian version of the UH-1H gunship, used in Vietnam,

nicknamed, “Bushrangers”.

During the Vietnam war, Australia’s only access to Helicopter

Gunships was by getting the Americans to lend them a hand

with theirs, but Australia’s need for there own Gunships was

too great, and the Bushranger was soon Born. The Bushrangers

Flew as part of the 9th Squadron, RAAF, and were used in many

roles, such as Helicopter Escorts, Troops Insertion, even Dustoff’s.

They were first put into service in Vietnam in March 1969, and

After a Great Combat Record, Went back to Australia

In December, 1971.

The Bushrangers often had one of the Main Rotor blades

painted Yellow, so they would be more visible form the air

when parked on the ground. The tail colors of white and

Light blue were changed from the, until then, standard red

white and blue, from long standing British tradition.


CONSTRUCTION


I soon discovered that there were NO update kits available for my desired

model, so I thought I might as well give scratch building the parts

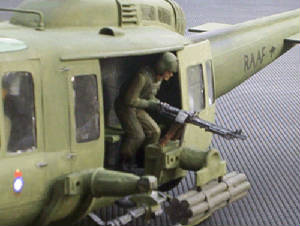
needed a shot.The Bushrangers were equipped with

7.62mm Miniguns and XM-158 rocket pods, and Door mounted

Twin M-60’s.These were the only parts that needed to be scratch built

(also including the ammo box for the M-60’s).

Luckily, this kit comes with the Miniguns, so I ended up not

having to scratch build these!


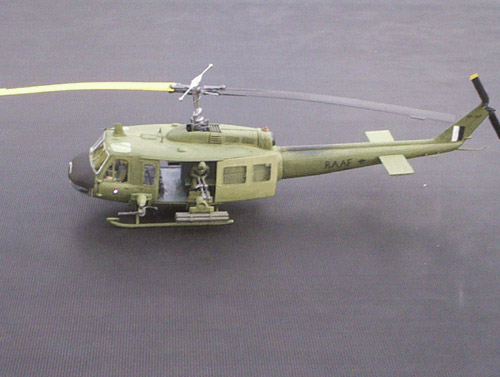
After finishing the Huey itself, it was time to start attaching the weapons.

I started with the easiest of the 3, the Miniguns.

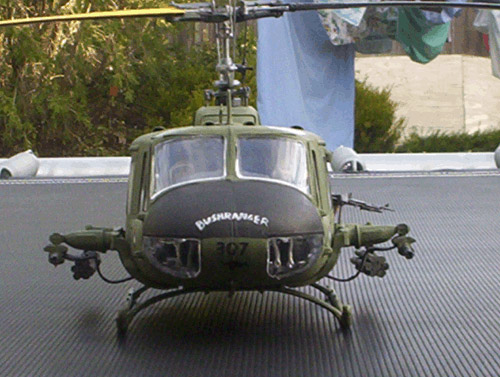
I then attached the arms that hold the Rockets, which involved making

a small tube to put in between the arm attached to the Huey, and the

arm attached to the actual pods, I made this from a small piece of plastic hose.


Once these were attached, I started the scratch building of the Rocket Pods.

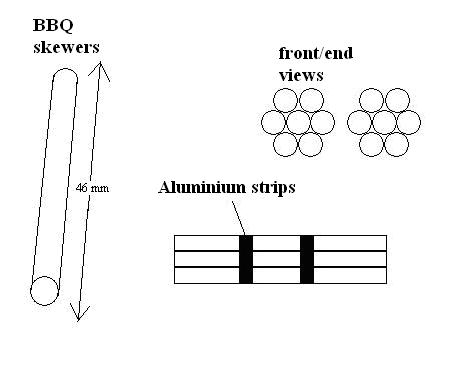
I initially began with plastic drinking straws, but realizing these were

way out of scale, I turned to wooden BBQ skewers, which turned

out perfect, I cut 14 of them to the length of 46mm each, then glued

them together, 7 “rocket tubes” for either pod.

I then used the aluminum from a pie tin for the two bars that hold

all the tubes together. I pained them Humbrol 66.

Once the pods were done, I attached them to the arm,

and the XM-158’s were done!

rocketpods.jpg

br-rockets.jpg


Next step were the M-60’s

For this I used the M-60’s that mount on the “pussy poles” from dragons

Vietnam helicopter crew set,

I used some stretched sprue to make the pussy pole and bars that hold

the M-60’s. I then  made the Shell extractor guard out of aluminum foil.

Once the Pigs were done I Then started the Ammo box, I made that out

of Milk carton cardboard, and again, aluminum for the top of it.

I then had to add a seat from Panda’s UH-1D set, for the door gunners

seat, and then added the door gunner himself, then the door gunners

smoke grenades (not visible),  which are mounted on the wall beside him,

 I made these out of plastic sprue and evergreen plastic strip.

Now this part was also done.

br-gunner.jpg

Now it was time for the Markings, all of which were hand painted, these are

the black kangaroos, the RAAF’s, the aircraft id numbers, both for the tail,

and the nose, the tail colors, and also the 9th Squadron insignia on the

pilot doors. Well now it was complete, after about a month of work it

was finally done, the body color is Humbrol 86, and the interior is Revell 71.

Well here she is, Bushranger A2-307.

br-side.jpg

br-front-view.jpg

Enter supporting content here

Copyright ©2004 by David Brown. Images also by copyright unless otherwise noted. All rights reserved